Installing and operating an engineering vehicle washer at your construction site is a straightforward process that, when done correctly, ensures reliable performance, compliance, and safety. Whether you’ve chosen a mobile, fixed-station, cold-water, or hot-water model, following a systematic approach to installation and operation will help you avoid mistakes, reduce downtime, and get the most out of your equipment. This step-by-step guide walks you through the key steps to install and operate an engineering vehicle washer, tailored to the needs of construction job sites and heavy-duty equipment.
Part 1: Pre-Installation Preparation
Before you begin installing your engineering vehicle washer, take the time to plan and prepare to ensure a smooth process.
Step 1: Choose the Right Location. For fixed-station washers, select a location that is easily accessible to your fleet (e.g., near the site entrance/exit or fleet yard) and has adequate space for large vehicles to maneuver. The area should be level to prevent water pooling and should be graded to direct wastewater toward a containment or drainage system (to comply with environmental regulations). For mobile washers, identify a central location that is accessible to all work zones and has access to water and power (if needed).
Step 2: Check Infrastructure Requirements. Verify that the location has the necessary infrastructure to support the washer. This includes:
– Water supply: A clean, reliable water source with adequate pressure (typically 40 to 60 PSI) and flow rate (check the washer’s specifications for requirements). You may need to install a dedicated water line or use a temporary hose connection for mobile models.
– Power source: For electric washers, ensure there is a grounded electrical outlet that matches the washer’s voltage and amperage requirements. For gas/diesel-powered models, ensure there is adequate ventilation (to prevent exhaust buildup) and space for fuel storage (if needed).
– Wastewater management: Install a containment system, such as a catch basin, trench drain, or portable berm, to collect wastewater. If required by local regulations, install a filtration or recycling system to treat wastewater before discharge or reuse.
Step 3: Gather Tools and Materials. Collect the necessary tools and materials for installation, which may include: wrenches, screwdrivers, hoses, fittings, clamps, a level, measuring tape, and safety equipment (gloves, goggles, steel-toed boots). Refer to the washer’s manual for a complete list of required tools.
Part 2: Installation Steps
The installation process will vary slightly depending on whether you’re installing a fixed-station or mobile washer. Below are the general steps for both types.
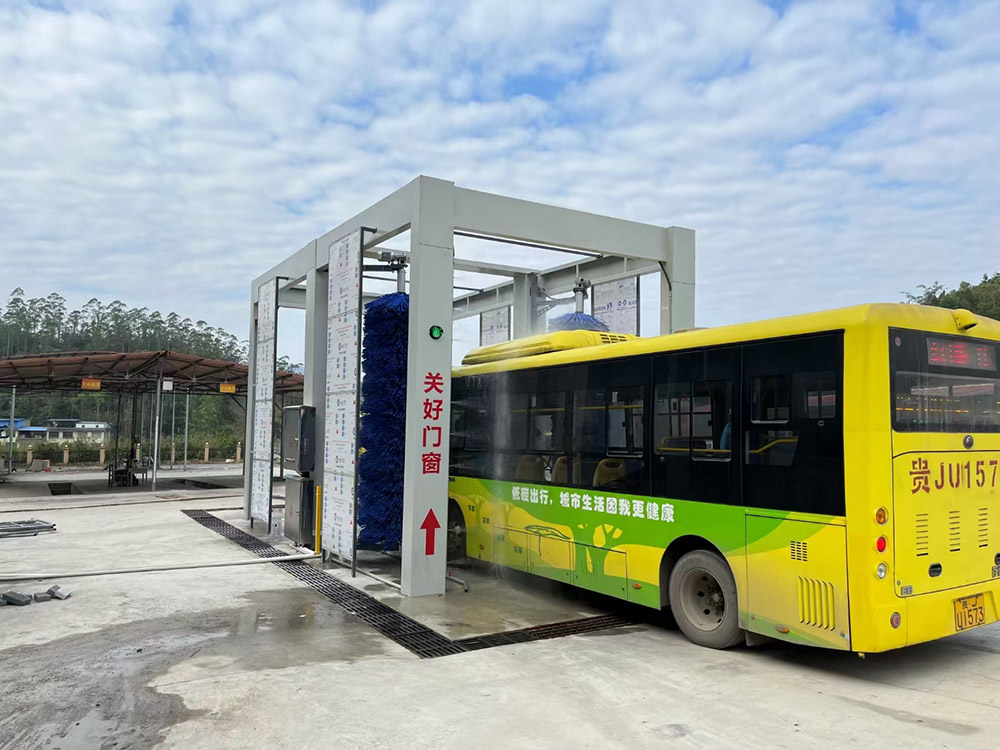
For Fixed-Station Engineering Vehicle Washers
Step 1: Secure the Washer. Place the washer on the leveled location and secure it to the ground using anchor bolts (provided with the washer or purchased separately) to prevent movement during operation. Use a level to ensure the washer is perfectly horizontal.
Step 2: Connect the Water Supply. Attach a high-pressure hose from the water source to the washer’s inlet port. Use fittings and clamps to ensure a tight, leak-free connection. Install a filter at the water inlet to prevent debris from entering the washer’s pump. Turn on the water supply and check for leaks—tighten any loose connections if necessary.
Step 3: Connect the Power Supply. For electric washers, plug the washer into the grounded electrical outlet. Ensure the outlet is protected by a circuit breaker that matches the washer’s amperage requirements. For gas-powered models, fill the fuel tank with the recommended fuel (check the manual) and ensure the engine is properly lubricated (check oil level).
Step 4: Set Up Wastewater Management. Connect the washer’s drain port to the containment system (catch basin, trench drain, etc.). If using a water recycling system, connect the containment system to the recycling unit and then to the washer’s inlet (to reuse treated water). Test the wastewater flow to ensure it is directed correctly and does not leak.
Step 5: Test the Washer. Turn on the washer and run it for a few minutes without applying pressure (e.g., with the nozzle disconnected) to prime the pump and check for any issues. Reconnect the nozzle, adjust the pressure to the lowest setting, and test the water flow. Check for leaks, unusual noises, or other problems—stop the washer immediately if any issues are detected.
For Mobile Engineering Vehicle Washers
Step 1: Position the Washer. Tow or move the mobile washer to the desired location. Ensure the area is level and stable to prevent tipping during operation. For trailer-mounted models, use jack stands to secure the trailer and prevent movement.
Step 2: Connect the Water Supply. Attach a portable water hose from the water source (e.g., a water tank or temporary faucet) to the washer’s inlet port. Use fittings and clamps to ensure a tight connection. Install a filter at the inlet to prevent debris from entering the pump. Turn on the water supply and check for leaks.
Step 3: Connect the Power Supply (if applicable). For electric mobile washers, plug the washer into a grounded extension cord (rated for the washer’s voltage and amperage) and connect it to a power source. For gas/diesel-powered models, fill the fuel tank and check the oil level. Ensure the area is well-ventilated to prevent exhaust buildup.
Step 4: Set Up Temporary Wastewater Containment. Deploy a portable berm or catch basin around the washing area to collect wastewater. If required, connect the containment system to a portable filtration unit. Ensure the containment system is large enough to handle the volume of water used by the washer.
Step 5: Test the Washer. Prime the pump by turning on the water supply and running the washer without pressure. Reconnect the nozzle, set the pressure to low, and test the water flow. Check for leaks, unusual noises, or engine issues (for gas models). Adjust the position of the washer or hoses as needed.
Part 3: Operation Steps
Once the washer is installed and tested, follow these steps to operate it safely and effectively.
Step 1: Prepare the Vehicle. Move the construction vehicle to the washing area and position it so that all areas (including the undercarriage, tires, and body) are accessible. Turn off the vehicle’s engine and engage the parking brake. Remove any loose debris (e.g., large rocks, branches) from the vehicle manually to prevent damage to the washer’s nozzle or pump.
Step 2: Prepare the Washer. Turn on the water supply and ensure there are no leaks. For hot-water models, allow the water to heat up to the desired temperature (typically indicated by a gauge on the washer). Adjust the pressure setting based on the vehicle’s dirt level—use lower pressure for delicate areas (e.g., mirrors, lights) and higher pressure for tough, caked-on dirt (e.g., undercarriage, tires).
Step 3: Start Washing. Begin washing the vehicle from the top down (roof, cab, body) and work your way to the bottom (tires, undercarriage). This ensures that dirt and debris are rinsed downward and do not contaminate already cleaned areas. Hold the nozzle at a 45-degree angle to the surface (avoid directing the spray straight at seals, electrical components, or paint to prevent damage). Move the nozzle in a slow, steady motion to ensure even cleaning.
Step 4: Rinse Thoroughly. After washing, rinse the vehicle from top to bottom with clean water to remove any remaining dirt or cleaning solution (if used). Ensure that all areas are thoroughly rinsed, as leftover debris can cause corrosion or damage.
Step 5: Shut Down the Washer. Turn off the washer and disconnect the power supply (unplug electric models or turn off the engine on gas models). Turn off the water supply and drain any remaining water from the hoses and washer to prevent freezing (in cold weather) or damage. Coil up the hoses and store them properly to avoid kinks or damage.
Part 4: Safety and Maintenance Tips for Operation
To ensure safe and reliable operation, follow these additional tips:
– Always wear safety equipment: Gloves, goggles, and steel-toed boots are essential to protect against high-pressure water and debris.
– Never point the nozzle at people or animals: High-pressure water can cause serious injuries.
– Avoid washing in freezing weather: If you must wash in cold weather, drain all water from the washer and hoses immediately after use to prevent freezing.
– Perform pre-operation checks: Before each use, inspect hoses, connections, and filters for damage or clogs.
– Follow the manufacturer’s guidelines: Refer to the washer’s manual for specific operation, maintenance, and safety instructions.
Conclusione
Installing and operating an engineering vehicle washer at your job site is a simple process that requires careful planning, attention to detail, and adherence to safety and compliance guidelines. By following the step-by-step instructions outlined above, you can ensure that your washer is installed correctly, operates reliably, and delivers effective cleaning for your heavy-duty construction equipment. Remember, proper installation and operation not only extend the lifespan of your washer but also ensure that your fleet stays clean, your operation remains compliant, and your team stays safe. With a little preparation and care, your engineering vehicle washer will become an essential tool that streamlines your operations and contributes to the success of your construction projects.